 “I never ate apple pie until I was an adult. Really! Perhaps it was because I grew up in Texas, not exactly known for apple orchards. (I did eat my fair share of peach pies though!) It wasn’t until I moved to New York from Texas that I began to appreciate apples… and apple pies. I still don’t care for mushy apples and syrupy sweetness. I make my pies with minimal sugar and thick slices of apples that keep a bit of their firmness. The dough is earthy (from the whole wheat) and buttery. If you want more sugar, just add it. If you want the apples to be softer, cut them into smaller pieces. You can also use white flour for all or part of it the pie crust, but that reduces the nutritional value.” ~ Bobbi
If you have a food processor and prefer to make the pie crust in it, feel free. You can also buy a frozen pie crust, thaw it and reshape it for this rustic look.

| Prep Time | |
| 45 mins |
| Cook Time |
| 1 hour |
|
|
|
Involved
Inexpensive!
Serves:8people
Serving Size:1/8 of a pie
|
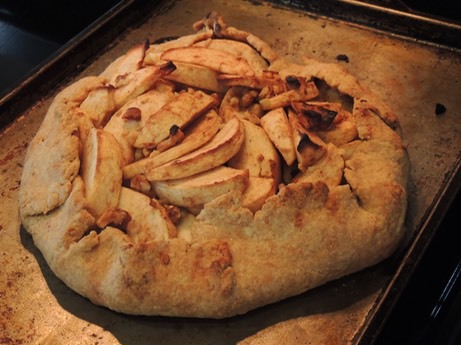
A rustic pie is hand-formed and doesn't require a pie pan, which most of our finite foodies don't own. Shape this one on a baking sheet, add some apples, fold over the edge and bake.
Tools:large bowl, pastry blender, cutting board or pastry mat, rolling pin, baking sheet
|
- 1-1/2 cups white whole wheat flour
- 1 tablespoon granulated sugar or coconut sugar
- 1/4 teaspoon sea salt
- 1/4 cup ice cold water
- 4 apples
- 1/2 lemon juiced
- 3 tablespoons granulated sugar or coconut sugar
- 1 teaspoon ground cinnamon
- 1/4 cup walnuts coarsely chopped
- 1 tablespoon butter
- maple syrup (optional)
- Combine flour, sugar and salt in a large bowl and stir.
- Take your butter out of the refrigerator at this point (you want it to be chilled) and place in the bowl. Use a dinner knife to cut the butter into 1/4-inch thick slices.
- Using a pastry blender (or 2 dinner knives), cut the butter into the flour until the butter is in small pieces about the size of peas.
- Add 1/4 cup ice cold water to the flour mixture. (We usually pour some water over ice and let it stand on the counter while we're cutting in the butter.)
- Using a fork and your hands, quickly mix the dough so it starts to stick together, for the most part.
- Dump the mixture onto a work surface, like a cutting board, granite or marble counter, wax paper, or if you have one, a non-slip pastry mat. Gather up all the dough and start kneading it with the heel of your hand, but only a few times. Do not over work the dough, or it will get tough.
- Form into a ball again and use the heel of your hand to press it flat until it’s about 6-inches in diameter. Wrap in waxed paper and place in the refrigerator while you prepare the filling.
- Wash, then peel the apples. Cut into quarters and remove the core. Cut each quarter into 3 to 4 slices. (Cut into smaller pieces if desired.) Place in a large bowl.
- Stir in the lemon juice, sugar, and cinnamon.
- Chop the walnuts and stir into the apple mixture.
- Preheat oven to 375°F.
- Roll out the dough on a floured surface to form about a 12-inch diameter. It should be about 1/8-inch thick. Transfer to a baking sheet.
- Pile up the apple slices in the center of the pie crust, leaving about 2-inches uncovered on the sides. (The apples will cook down quite a bit, but feel free to eat a few slices to help them fit!)
- Fold the edges of the pie crust up and over the outer edge of the filling.
- Cut 1 tablespoon butter into small pieces and sprinkle over the exposed apples.
- Bake about 45 minutes, until apples are soft. (This is not a very juicy or bubbly filling. Double the sugar and butter if you want it to be juicier.)
- Cool slightly then serve with some maple syrup drizzled on top, if desired.
- Pie crust made in a food processor: Place the flour, sugar and salt into the bowl of a food processor and pulse briefly to mix. Cut butter into 1/4-inch thick slices and scatter around the bowl. Pulse about 6-8 times for a few seconds each time, until the butter is in pea-size pieces. Drizzle the ice water into the flour mixture as you pulse the processor, until it forms into a ball. Don’t overdo it! Stop as soon as it is mostly in a ball. Continue with step 6 above.
- Apple Pie in a pie pan: Place the pie crust in a 9 -inch pie pan, then fold and crimp the edges with your fingers. Double the filling recipe and pile up high. Dot with the butter and bake 50-60 minutes at 375°F.

Leave a Reply
You must be logged in to post a comment.